How To Set Up NordVPN on a Samsung Smart TV

NordVPN is compatible with many devices and popular operating systems, however, the VPN application cannot be directly installed on your Samsung Smart TV.
Samsung’s TV operating system Tizen (pre 2015 ‘Orsay’) does not support VPN apps or services. However there are alternative, indirect methods to connect NordVPN to your Samsung Smart TV.
This step by step guide details 3 recommended methods to install NordVPN on your Smart TV, these include via PC (Windows), SmartDNS or Router.
Steps below based on an active subscription and the NordVPN application installed.
Set Up via PC mobile hotspot (Windows 10 and 11)
Follow the steps below to create a mobile hotspot from your PC that will allow your Smart TV to connect and use the NordVPN service. For older versions of Windows follow this NordVPN guide.
- Go to Settings > Network & Internet > Mobile hotspot
- Select Wi-Fi and enable Mobile hotspot:
- Go to Settings > Network and Internet > Change adapter options:
- Right-click on TAP-NordVPN Windows Adapter and select Properties:
Please note: After adjusting the adapter, you will need to switch to the according protocol within the NordVPN app. In this case, you will need to switch either to the TCP or UDP protocol. - Select the Sharing tab and check the Allow other network users to connect through this computer’s internet connection box. From the dropdown menu, select the hotspot you’ve just created. You can find its name above the adapter tagged as Microsoft Wi-Fi Direct Virtual Adapter.
For those wishing to connect via PC using an Ethernet cable follow this NordVPN Guide.
Set Up via SmartDNS Proxy
If you are looking for secure encrypted services, this may not be one of the best choices for you, but if you are simply looking for a geo-unblocker for your TV so you can have access to more sites, then you are on the right track. Also, it can be directly installed on your Smart TV, and only needs to be configured once.
SmartDNS proxies are excellent for making your online streaming experience a breeze. If you enjoy heavy streaming, especially on restricted streaming sites such as Netflix, Amazon Prime, etc, DNS proxies are great for you. They are one of the best methods to unblock geo-restricted sites so that you can stream content freely. Unlike a VPN, however, SmartDNS does not provide encryption for your data, which still leaves it susceptible to trackers, hackers and malicious sites.
You can also activate the SmartDNS feature within the NordVPN Account dashboard.
- First, click on the MENU button on the Samsung Smart TV’s remote control
- Then proceed to work your way through until you get to NETWORK
- Next, click on Network Status, then IP settings.
- Open DNS Settings and choose “Enter Manually.”
- Enter your DNS Server Address and then select OK
Primary: 103.86.96.103 Secondary (if available): 103.86.99.103 - Start your Samsung Smart TV once the connection test is completed.
Set Up via Router
This method is one of the surest and most utilised ways to connect a VPN service to your Smart TV. The reason it is considered the most straightforward is that as soon as the Virtual Private Network is configured, your Samsung Smart TV and other devices you connect to the router get an automatic connection to NordVPN so they can be fully protected.
To set up your NordVPN, you will need a compatible router. From Dec 1st, 2018, NordVPN servers stopped supporting L2TP/IPsec and PPTP connections. For a NordVPN connection to your router to work, it needs to support OpenVPN. It also needs to support it as a “Client,” not a “Server” before it can work with NordVPN servers.
The instructions below are specifically for the DD-WRT router because it supports OpenVPN and is one of the most versatile routers available. It is easy to configure and adopts new settings without any trouble. Also see the list of NordVPN supported routers and firmware
- First, head to Setup, and then to Basic Setup.
- Scroll down to Network Address Server Settings (DHCP). Here, set the NordVPN DNS addresses:
Static DNS = 103.86.96.100
Static DNS 2 =103.86.99.100
Static DNS 3 = 0.0.0.0 (default)
Use DNSMasqfor DHCP = Checked
Use DNSMasqfor DNS = Checked
DHCP-Authoritative = Checked - Now, save and apply these settings.
- Next, go to Setup>IPv6. Set IPV6 to Disable, then save and apply these settings. This step is necessary to ensure you are guaranteed zero IP leaks.
- Afterwards, go to service> VPN, and then Under OpenVPN Client, set Start OpenVPN Client = Enable (to see the options needed for configuration.) Next, Set the following:
Server IP/Name = (For this guide, we will use us936.nordvpn.com, but you should make use of one from https://nordvpn.com/servers/tools/ ), then select the “Show available protocols,” and proceed to download UDP or TCP configuration file. It is necessary for the steps below. The server hostname can be found under the server title.
Port – 1194 (or 443 for TCP protocol)
Tunnel Device = TUN
Tunnel Protocol – UDP (or TCP)
Encryption Cipher = AES-256-CBC
Hash Algorithm = SHA-512
User Pass Authentication = Enable
Username and Password = Your NordVPN details
If the last field above is missing, proceed to the next step in 6 below.
Advanced options = Enable (to turn on additional advanced options)
TLS Cipher = None
LZO Compression = Disable
NAT – Enable
Any item not mentioned in the guide should not be tampered with. Depending on the conditions fulfilled in step 5, if the Username and Password fields are missing, do this: - Head to Administration > Commands, and enter this code by copying and pasting it:
echo “YOURUSERNAME YOURPASSWORD” > /tmp/openvpncl/user.conf/usr/bin/killall openvpn/usr/sbin/openvpn –config /tmp/openvpncl/openvpn.conf–route-up /tmp/openvpncl/route-up.sh –down-pre /tmp/openvpncl/route-down.sh –daemon - Swap the “YOURUSERNAME” and “YOURPASSWORD” inside the code with your relevant NordVPN details.
- Next, save Startup, and go back to the former VPN tab.
- Next, in the Additional configuration box, copy and paste the following commands:
remote-cert-tls server
remote-random
nobind
tun-mtu 1500
tun-mtu-extra 32
mssfix 1450
persist-key
persist-tun
ping-timer-rem
reneg-sec 0
#log /tmp/vpn.log
#Delete `#` in the line below if your router does not have credentials fields and you followed the step 6 #auth-user-pass /tmp/openvpncl/user.conf - Then open the OpenVPN configuration that you downloaded in Step 5 in any of the following text editors of your choice: Notepad++ or WordPad. The regular Notepad app cannot work because it doesn’t have the right formatting.
- Once you can open the .ovpn file of any server you have chosen, the server you should be seeing is us936_nordvpn_com.udp.ovpn On any of the text editors mentioned above, you should see <ca>, this part of the file should NOT be copied; both the <ca> and </ca> tags.
- Copy only from the lines in-between those tags, beginning from ——BEGIN CERTIFICATE—— and ending with ——–END CERTIFICATE—— . Paste the entire text in the CA cert box.
- Return to the configuration file and scroll to <tls-auth>. Copy the contents of the key, starting at “–—–BEGIN … “and stopping at “END… key V1—–” Then paste it into the required TLS Auth Key field.
- Once all these data have been entered accurately, Save and Apply the settings.
To confirm that it was excellently done and that your VPN is now working, go to Status>OpenVPN. Under the State option, it should display – Client: CONNECTED SUCCESS
NordVPN Features and Benefits
1. Online Security and Data Protection
Signing up to any of the plans on NordVPN gives you full protection and security of all your online information. Its privacy policies and security measures are rated as one of the best on the market. To ensure that all your information is encrypted and secure, NordVPN has some key features, including specific protocols that are known for top-notch security.
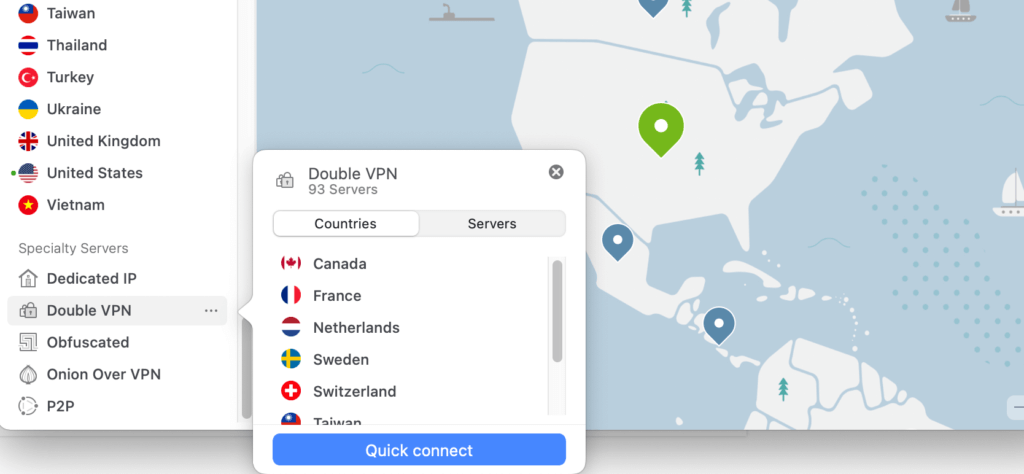
The most important of these six features is the Double VPN that gives you double encryption to keep your data extra safe. There is also the Onion Over VPN feature that not only encrypts your data, but it also takes it through multiple layers of privacy through a network called TOR.
Another essential feature is the automatic Kill-Switch that gets turned on as soon as a drop is detected in the VPN connection. That is done to ensure your data does not become vulnerable to malicious sites and online criminals.
Its strict no-logs policy also makes the list of protective features. This policy ensures that under no circumstances will your data be recorded, kept or shared by the NordVPN company.
2. Quality Geo-unblocking Services
Another great feature that users benefit from using NordVPN is its powerful unblocking feature. It gives you access to almost all the geo-restricted streaming apps you wish to stream or download from like for example Hulu, BBC iPlayer, Roku, Amazon Prime and Netflix. It has over 5200 servers in 59+ countries; this means that you’re no longer restricted by location when you need to access sites outside of your region.
3. No More Annoying Ads
With NordVPN, you no longer have to worry about annoying and unsolicited pop-up ads. Pop-up not only interrupt your online activity but also sometimes slow down your internet usage and may be dangerous and malicious. NordVPN offers its users this great feature once they are subscribed to a NordVPN plan, therefore giving them a faster and ad free online experience.
Summary
We hope this guide helped you understand each method of setting up NordVPN on your Samsung Smart TV, you may also like to read our full NordVPN review where we rate features and performance, alternatively take a look at all of our VPN provider reviews.